
CREATIVE
BRANDING
EXCERCISE

2.5cm cubed


3D Printed
HndCRAFTED
PUZZLE
SIDES:6
INTERLOK©
Precision

I. INTRO
1
ABSTRACT
I've had this idea of a puzzle cube promotional piece for over a decade now.
When I originally designed my 2D hexa-star logo, I did it with this 3D shape in mind. I've always liked the shwag I've picked up from studios, and design houses over the years. When it's done right it can transcend the membrane from obnoxious promotional trinket to thoughtful curiosity worth keeping, and representative of what it promotes. I wanted to create something like that for my branding. A little research, and a whole lot of trial and error later, I was left with a puzzle cube cube that is expressive of my mission as a designer, animator, and general creative.
This one is based on a foam cube of similar design I had when I was young, and it was one of the original foam 3D puzzles. I didn't find any satisfactory ones for purchase I could brand in any acceptable way, so I decided to make one. I bought a 3D printer and quickly trained on how to tune it in as finely as possible. The joints would have to be very accurate to snap together without being too tight or too lose, so precision from start to finish was paramount. Over the course of 6 test runs, I dialed in the final measurements, and explored the overall cube form. Because 3D printing at an affordable range is still very young, the detail quality is only acceptable down to a certain scale. I took the unavoidable inconsistencies of printing as a challenge to make the smoothest cube I possibly could. I felt that if the cube is perfectly smooth with precise seams, then that would serve as evidence of precision, design, and craftsmanship. When considered all at once, this project's scope crosses a great many creative disciplines. Graphic design, motion design, web design, industrial design, all orchestrated in a unified branding schema that still affords the leeway for the components to speak their own language.

EXPLODED VIEW
PARAMETERS & MATERIALS
What is a good project without narrow parameters? For this I chose to omit mass production shortcuts wherever possible to stay true to the do-it-yourself ideal. I printed, cut, polished, sanded, and glued every item in every package personally. I operated in a "clean room" mindset to ensure every piece remained pristine to delivery. Finally due to the cost of ink being more valuable per oz than gold, I used as little as I could, and still get the idea across in a memorable way. I wanted the most output with as little material as possible. Maximized minimalism.
MATERIALS:
-
Surface 4 Pro Tablet Computer
-
Creality CR10 3D Printer
-
HP OfficeJet Pro 8600
-
Various papers and cardstocks
-
Scalpel
-
Sanding materials
-
Elmer's Glue
SOFTWARE:
-
Cinema 4D
-
MoDo
-
Cura
-
UT2K4
-
Illustrator
-
Photoshop
-
After Effects
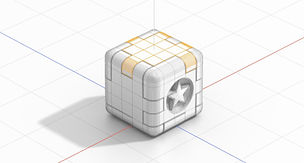
MoDo Viewport Render

MoDo Render

3D Print Photo
II. LOGO
2
LOGO DESIGN
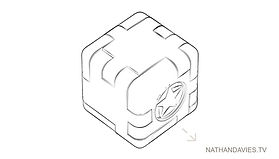
When I was designing my logo initially, I wanted a shape that represented as many aspects of my creative scope as possible. It reads well flat, but is a 3D object as well. The placement of the circle/star completes the deliniation between hexagon and cube giving the logo a 2.5 dimensional impression. The star on the flat logo is tilted perceptably clockwise to hint at the passage of time, or animation. Finaly, the logo recurses from positve to negative to positive space in the language of layered composite while simultaneously creating one. My logo is all these things and a little off center with intent.

NATHAN DAVIES
LOGO TREATMENTS & INCARN8TIONS
GALLERY
III. D
3
MODELING
I began by exploring what size the cube should be, bearing in mind that the 3D printer's limitations would weigh heavily in the final design. I decided on a 2.5cm cube. It's a novel size, doesn't use a lot of material, and is within an acceptable threshhold for quality of print. Using an unfolded template from the internet, I projected the initial shapes and built the geometry on a 5mm unit grid in MoDo. I used MoDo because I appreciate it's forced attention to scale. Scale and measurement precision were very important to get this shape all the way through the pipeline, and into physical reality, so I felt the modeling tools and attention to precise units made MoDo a good choice. Once the puzzle pieces were adjusted for printer overspill and material workability, I carved away at an assembled 3D version to produce the logo shape, at scale, ready for print

3D DESIGN
GALLERY
3D development of the cube in MoDo.
1NTERACTIVE 3D CU3E MODEL
3D MODEL
RIGHTCLICK=ORBIT MOUSEWHEEL=ZOOM LEFTCLICK=PAN
IV. 3D PRINT
4
3D PRINT
After extensive research into the 3D printing world, I bought a 3D printer from a company in China. I decided on the Creality CR10 for it's reliability and build volume. It seemed to be in line with the standard for current extruder printers, so parts and supplies would be easy to acquire.
I spent some time making various prints to understand the printer better, and fine tune the settings I would need to make my cube a reality. It's the cutting edge of personal manufacturing, but still a very young industry. Where circuit boards were the domain of the hobbiest in the late 70s, 3D printing is that to the contemporary technophile, in my opinion. I look forward to a Star Trekesque replicator in the not too distant future.

3D PRINTER FINAL (BEST) SETTINGS
50% INFILL
50mm/s HEAD SPEED
210°c NOZZLE TEMPERATURE
70°c BED TEMPERATURE
1mm LAYER HEIGHT
BRIM -PLATFORM ADHESION TYPE

Creality CR10 3D Printer
3D PRINT PHYSICAL EVOLUTION
GALLERY
Development of the cube as a physical, interactive object.
3D PRINT POST PROCESS
GALLERY
Once the 3D print is done. It's still far from finished.
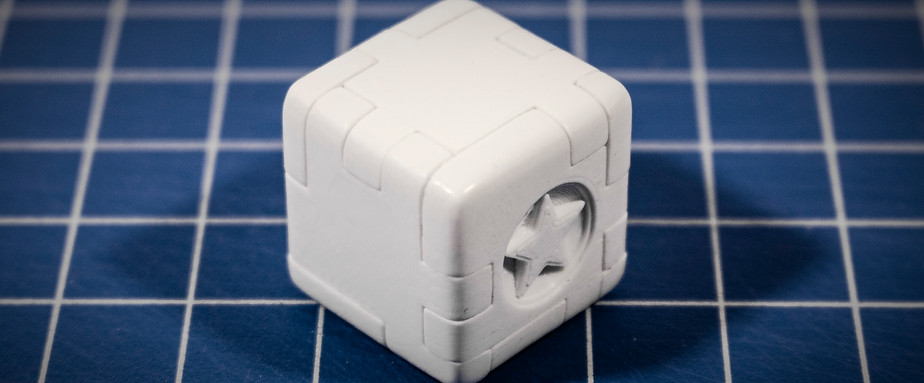
no.16
FINISHED
[PLA] MODEL
EXTRUDED:Polylactic Acid
(C3H4O2)n
210°c ->30°c
INFILL:50%
LAYER TOP/BTM: 1.2mm
WALL: 1.2mm
CU3Ever.v07 3DPno.16| S3ST:09.18
2.5cm
X
Z
Y
MINIATURE PHOTOGRAPHY EQUIPMENT COUTRESY OF BOBBY PHILIPS
DYNOMIC
POLYSYNTHETICS
V. PACKAGING
5
PACKAGE DESIGN
The contents of a package is irrelevant if never opened. It is the duty of the package design to entice the user to discover it's contents. My branding throughline is a very precise paper collage, reminiscent of the physical magazine layout techniques of the golden era of print design, pre computer. I wanted the trimmed paper asthetic I had crafted in the digital realm to echo in the physical world, so I opted to cut, and manufacture the packaging all by hand. Finish it all off with a classic shrink wrap machine for a legitimate final product look.
Inside is the cube piece tray, complete with pieces locked in by tabs, two business cards, and one art insert/ backing card. When the componants are arranged side by side, they make up a small storyboard of an exploded cube assembly animation, as well as serve as an example of the puzzle solution.

Shrink wrapped final CU3E product.
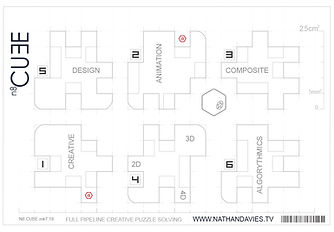
FR 01
Puzzle Piece Tray
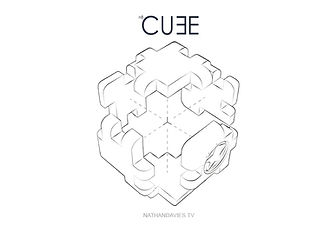
FR 02
Art Inset Card
FR 03
Business Card
PACKAGING
GALLERY
Final product and miscelaneous
6
VI. TIMELAPSE
CU3E PACKAGE ASSEMBLY TIMELAPSE
From plastic and paper to proper promotional product in under an hour.....each.
TIMELAPSE = TIME CONSUMING
I thought a timelapse video of the construction of one CU3E package from 3D print to shrink wrapping would be a cinch. I had to make a couple dozen anyway, so let's film one. Because I am away from home for the season, I had to use the limited space and equipment I had on hand, not much, definitely a far cry from a studio environment. Lighting, improper equipment, improper set conditions, and improper technique were all obstacles to be overcome. For the overall look, I chose a clinically filmed, documentary style, reminiscent of 60s era NASA research films. This style relieved a lot of lighting and set concerns as long as the content was measured, precise, and the compositing was true to the tone.
This is the 4th take of what turned out to be about a 50min operation every time. The timelapse runs at 1000x speed, and even at that speed it is 5min long. I needed to punch it up a bit to keep interest. I added the descriptors of the process, logo animations, timecode, EQs, and nameplate to keep the frame alive and interesting. Finally, I decided to warp the sense of time a little by adding the consistently rotating cubey-go-round in the midground. What it lacks in exposition about the process, it more than makes up for with visual style and challenging duration.

A humble shooting set.
I designed a makeshift scrim scaled appropriately to the subject matter out of cardstock, cardboard, and masking tape. The mirror acts as a crude light multiplier so I can get a decent backlight and double total available light, and enhance the sense of symmetry.
VII. CONCLUSION
7

SHRINKWRAPPED
REINFORCED
BACKPLATING
10 PIECE SET


100% HANDCRAFTED
SOLUTION INCLUDED
FROM THE CREATOR OF 'FRACTALIS,' 'SPACE MARINE,' and 'HARLEY TALK'
MULTIFACETED
CREATIVE
DEMONSTRATION
Final shrink wrapped deliverable package.
FINAL THOUGHTS
GALLERY
CONCLUSION
That was a lot of f^cking work. I hope you have enjoyed this breakdown as much as I enjoyed creating it. This project represents my entire creative repertoire condensed into a tiny cube. Much of it I had no or little prior experience with, namely: 3D printing, photography, full animation pipeline C4D, MoDo 3D modeling, timelapse photography, retail quality package design, finishing and detailing plastics. It taught me to trust my instincts for what I am adept at, push ahead thoughtfully at what I'm not, and keep the needle moving every single day.
I thought after all this was done I'd be left with a trinket mailer, enough to stand out for a flash. After considering the height, width, and depth of this project, I feel like I have generated a bit more. The subject is a simple, tiny cube, but it has been infused with the qualities I chose to comprehensively represent me and my scope of creatively.
And that's branding.
STATS PER CUBE
3D PRINT: 3.5hrs
PRINT FINISHING PROCESS: 1hr
PACKAGING CONSTRUCTION: 30min
COST: <$1.00
SHIPPING: $3.50
PROFICIENCIES DEMONSTRATED
-
Creative Direction
-
Graphic Design
-
Industrial Design
-
Package Design
-
Web Design
-
Motion Design
-
Copy Writing
-
3D Modeling
-
3D Texturing
-
3D Lighting
-
3D Animation
-
3D Rendering
-
Compositing
-
Editing


